Hi all,
I started painting this past December and can’t get enough! With our kids getting older and finally finishing the last of several family construction projects over the years, I suddenly found myself with free time. My wife is now regretting pushing me to find a new hobby.
I’m heavily into the imperial Roman period. I’ve built two diorama’s as part of the learning process to acquire some experience. Just discovering this website now I’m in awe at the talented works of art the members of this group have created! It’s truly inspiring.
One of the areas I can’t get over is how well so many of you have blended your figures feet into the scenery. I’ve been basing my figures such that the grass or soil colors are of the same materials of where they are being placed, but the bases themselves create a little “hill” if you will that elevates the figure a few millimeters above the remaining terrain.
Can you offer any advice on how you make it blend in so perfectly? Are you cutting off the bases and glueing the figures feet directly to the diorama. I thought about thinning the figures base down by melting it on a hot plate. Any advice you can give would be greatly appreciated.
Thanks so much!
Dave

Modelling
Help needed - how to make bases disappear
15 posts
• Page 1 of 1
-
Dave2024

- Posts: 9
- Member since:
20 Jul 2024, 02:42
I'm certainly not one of those 'talented members' you refer to but to get the ball rolling....
Scale? Manufacturer?
I use 1/72 exclusively & *most* bases aren't that thick - 1-2mm thick in plastic. Some metals have thicker bases - eg Kennington. Being metal, filing them thinner is fairly easy.
I find basing covers the figure base quite well.
A thick coating of white wood glue, lapped up to and over the figure base - being careful not to cover the feet, tends to be the needed 1-2mm thick.
Obviously, on this I spread small pebbles or various grades of flock.
I am quite keen on the Vallejo earth products - large containers of variously coloured earths:
https://norerolls.co.uk/2024/01/09/revi ... e-and-mud/
This, spread on bases, covers up nicely.
These might give you an idea:

donald
Scale? Manufacturer?
I use 1/72 exclusively & *most* bases aren't that thick - 1-2mm thick in plastic. Some metals have thicker bases - eg Kennington. Being metal, filing them thinner is fairly easy.
I find basing covers the figure base quite well.
A thick coating of white wood glue, lapped up to and over the figure base - being careful not to cover the feet, tends to be the needed 1-2mm thick.
Obviously, on this I spread small pebbles or various grades of flock.
I am quite keen on the Vallejo earth products - large containers of variously coloured earths:
https://norerolls.co.uk/2024/01/09/revi ... e-and-mud/
This, spread on bases, covers up nicely.
These might give you an idea:
donald
-

Ochoin
- Posts: 2468
- Member since:
16 Jan 2010, 04:00
Hi Dave, welcome.
What you're asking is, to quote a Disney film, a tale as old as time. Well as old as little plastic men on bases, anyway.
For myself I use ready mixed grout. It depends where you're from but here in the UK I use TileFix (or something like that) from our local supermarket.
Squeeze a small amount onto a palette - I use the tops off Pringles tubes - when they get too clagged up, if you flex the plastic the paint and filler flake off, leaving you with a clean palette. (And of course you have to 'acquire' them to begin with!). The grout gives you a decent working time but you only need a small amount, otherwise it's wasted.
Apply it with a sculpting tool or a clean old modeling knife blade, the finer the better to get it into place. Keep wiping the blade clean.
Fill the space between the top of the figure's base and the unit base, but leave the top of the figure base clean if you can. This makes it look more like the figure is on the surface of the ground, and not clambering over the terrain. Use smooth strokes and aim for a clean surface rather than a moonscape. That makes painting it easier.
If you use movement trays like I do, clean the edge of the figure base off so you can fit it into the slots on the movement tray.
Grout can also be mixed with things like ModPodge to get a better coverage but I tend to use that for terrain pieces rather than individual figure bases.
A Dark Alliance Warrior of the Dead. The figure is on an MDF lozenge shaped base.

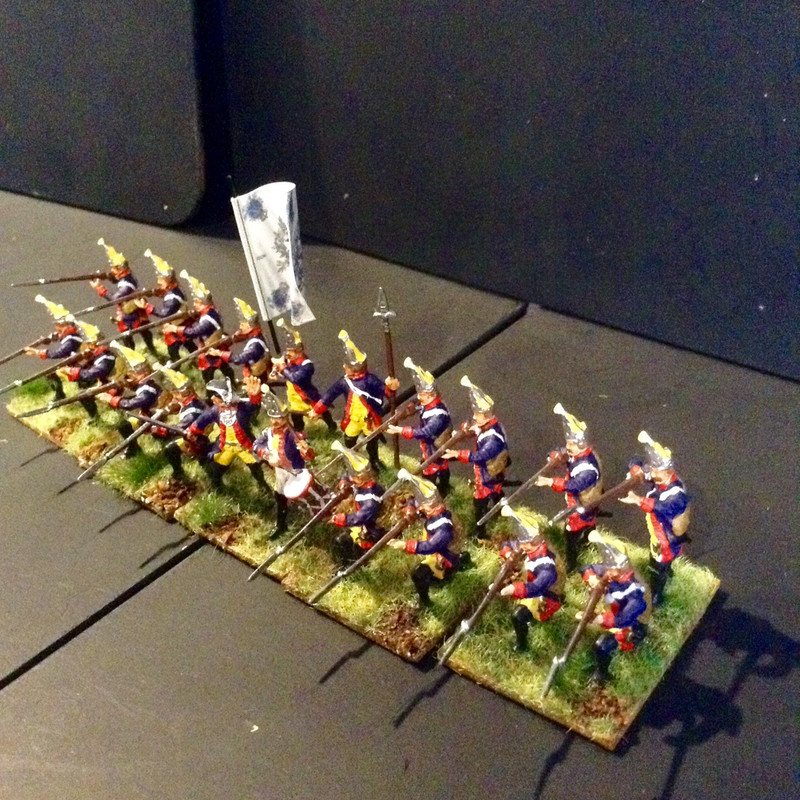
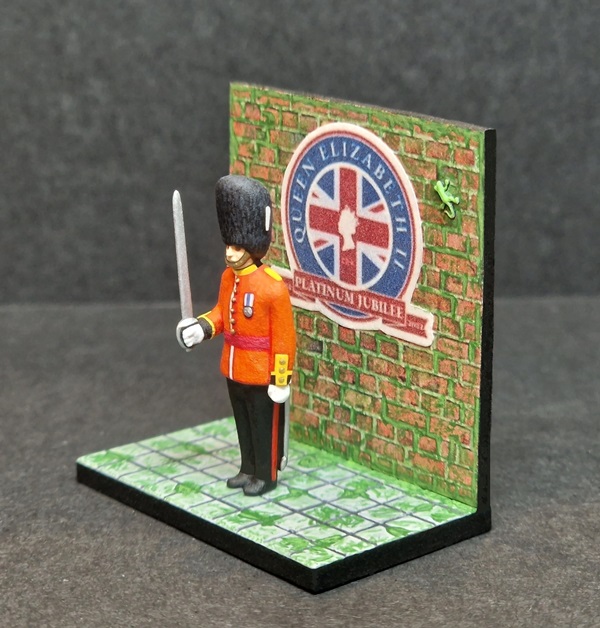
The 'King in Yellow' from my latest project, Red Box 'King' (Louis XIV) figure is mounted onto a 20mm diameter plastic base, and blended into it with the grout paste. I made sure that the edges are clean and the surface is smooth.

12 mixed 'heavy shot' - a mix of MiniArt and Red Box, individually mounted on 20mm bases, on a movement tray - and why it's so important to get the edges clean.

The grout can also be used to fill and improve mdf surfaces - I used it here to fill any gaps in the walkway and then applied it over the surface, and polished it with the knife blade to get an ancient 'concrete' look, like a well-used and worn surface.

Hope you find this useful - let me know if you have any questions, always happy to help.
What you're asking is, to quote a Disney film, a tale as old as time. Well as old as little plastic men on bases, anyway.
For myself I use ready mixed grout. It depends where you're from but here in the UK I use TileFix (or something like that) from our local supermarket.
Squeeze a small amount onto a palette - I use the tops off Pringles tubes - when they get too clagged up, if you flex the plastic the paint and filler flake off, leaving you with a clean palette. (And of course you have to 'acquire' them to begin with!). The grout gives you a decent working time but you only need a small amount, otherwise it's wasted.
Apply it with a sculpting tool or a clean old modeling knife blade, the finer the better to get it into place. Keep wiping the blade clean.
Fill the space between the top of the figure's base and the unit base, but leave the top of the figure base clean if you can. This makes it look more like the figure is on the surface of the ground, and not clambering over the terrain. Use smooth strokes and aim for a clean surface rather than a moonscape. That makes painting it easier.
If you use movement trays like I do, clean the edge of the figure base off so you can fit it into the slots on the movement tray.
Grout can also be mixed with things like ModPodge to get a better coverage but I tend to use that for terrain pieces rather than individual figure bases.
A Dark Alliance Warrior of the Dead. The figure is on an MDF lozenge shaped base.
The 'King in Yellow' from my latest project, Red Box 'King' (Louis XIV) figure is mounted onto a 20mm diameter plastic base, and blended into it with the grout paste. I made sure that the edges are clean and the surface is smooth.
12 mixed 'heavy shot' - a mix of MiniArt and Red Box, individually mounted on 20mm bases, on a movement tray - and why it's so important to get the edges clean.
The grout can also be used to fill and improve mdf surfaces - I used it here to fill any gaps in the walkway and then applied it over the surface, and polished it with the knife blade to get an ancient 'concrete' look, like a well-used and worn surface.
Hope you find this useful - let me know if you have any questions, always happy to help.
-

steve_pickstock
- Posts: 1336
- Member since:
20 Jun 2010, 19:56
First of all welcome to the forum, Dave. 
In relation to your query, I can only tell you what I do, a solution as valid as others that other forum members can offer you.
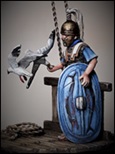
I always use plastic figures and cut their bases with a scalpel blade before converting and painting them, and once painted I glue them directly to the base of the diorama or vignette.
Here are pictures of some of my works published in the forum where you can see the technique I just told you about.


I hope I have been helpful. Best regards.
Santi.
Dave2024 wrote:...One of the areas I can’t get over is how well so many of you have blended your figures feet into the scenery. I’ve been basing my figures such that the grass or soil colors are of the same materials of where they are being placed, but the bases themselves create a little “hill” if you will that elevates the figure a few millimeters above the remaining terrain.
Can you offer any advice on how you make it blend in so perfectly? Are you cutting off the bases and glueing the figures feet directly to the diorama. I thought about thinning the figures base down by melting it on a hot plate. Any advice you can give would be greatly appreciated...
In relation to your query, I can only tell you what I do, a solution as valid as others that other forum members can offer you.
I always use plastic figures and cut their bases with a scalpel blade before converting and painting them, and once painted I glue them directly to the base of the diorama or vignette.
Here are pictures of some of my works published in the forum where you can see the technique I just told you about.
I hope I have been helpful. Best regards.
Santi.
-

Santi Pérez
- Posts: 2035
- Member since:
28 Aug 2016, 19:42
Thanks for the different methods, I’m going to try them all out. I work in 1/72 scale, all imperial Roman, using Hat, Italeri, Linear, Strelets, Orion, Zvezda and Red Box so far. I’m trying everything out to get a good feel for the differences and how I can blend the different sets together.
As soon as I can figure out how to attach some pictures I’ll put them up on the site.
Thanks!
Dave
As soon as I can figure out how to attach some pictures I’ll put them up on the site.
Thanks!
Dave
-
Dave2024
- Posts: 9
- Member since:
20 Jul 2024, 02:42
Welcome to the Forum, Dave! Glad to see another "Romans-Guy" in the community!
I think the best way is, to cut the bases off, like Santi said. You could have success with sinking them in the ground material, but this will bring you only so far... If you look at Santi´s examples, most of the dios would not have worked that well, with the bases still attached. When there is no ground to sink the bases in (either not enough space or not the right material), cutting them off does the trick!
I think the best way is, to cut the bases off, like Santi said. You could have success with sinking them in the ground material, but this will bring you only so far... If you look at Santi´s examples, most of the dios would not have worked that well, with the bases still attached. When there is no ground to sink the bases in (either not enough space or not the right material), cutting them off does the trick!
-
Ben90

- Posts: 1517
- Member since:
28 Apr 2011, 23:32
Help keep the forum online!
or become a supporting member
Here goes nothing, I've been trying to upload photos for awhile now. Please let me know if this works. Thanks!

-
Santi Pérez likes this post. •
- Reply
-
Dave2024
- Posts: 9
- Member since:
20 Jul 2024, 02:42
Dave2024 wrote:Here goes nothing, I've been trying to upload photos for awhile now. Please let me know if this works. Thanks!
Nope - sorry Dave, looks like it may be a privacy thing on Google.
-
steve_pickstock
- Posts: 1336
- Member since:
20 Jun 2010, 19:56
Hello again, Dave. Perhaps this old thread could be useful for you to upload your pictures to the forum. I personally use the free Postimage photo host and it works very well for me so far.
http://bennosfiguresforum.com/viewtopic.php?f=21&t=47
Santi.
http://bennosfiguresforum.com/viewtopic.php?f=21&t=47
Santi.
-
Santi Pérez
- Posts: 2035
- Member since:
28 Aug 2016, 19:42
Thanks guys!
I found a work around using Postimage like you recommend. They charge $39 USD a month for it here after 3 days free. However….you can upload your images, copy the Direct Link, paste it here on the forum and then close out of Postimage before having to set up an account there and enter credit card info.
I posted my first two practice models on the gallery tab. Let me know what you think and other ways I can improve. Thanks!
Dave
-
Dave2024
- Posts: 9
- Member since:
20 Jul 2024, 02:42
Try imgbb - that's free - though I have had issues with images not showing recently. Click on the link on your uploaded image, select medium linked, copy the offered link and bob, as they say is your uncle.
-
steve_pickstock
- Posts: 1336
- Member since:
20 Jun 2010, 19:56
I’ve still not mastered this and I see my own posts and look at some of the exposed bases and cringe!
The cutting off of bases is the most sensible solution I think, but I can’t bring myself to do it!
For the size of bases that I do I find that using AK and Vallejo mud textures works well as a ground base. I apply a layer to the dio/gaming base and Whilst it’s drying I stick the figures into the base and used an old brush to try and remove any gaps between the base’s figures and the mud material. Once dry I will use tufts and grass to cover up any bad joins. It’s not perfect, but works to some extent.
-
Rich W

- Posts: 1318
- Member since:
05 Feb 2018, 23:40
I never cut off their bases as the figures cannot be glued correctly after that and also because it is too much effort for me.
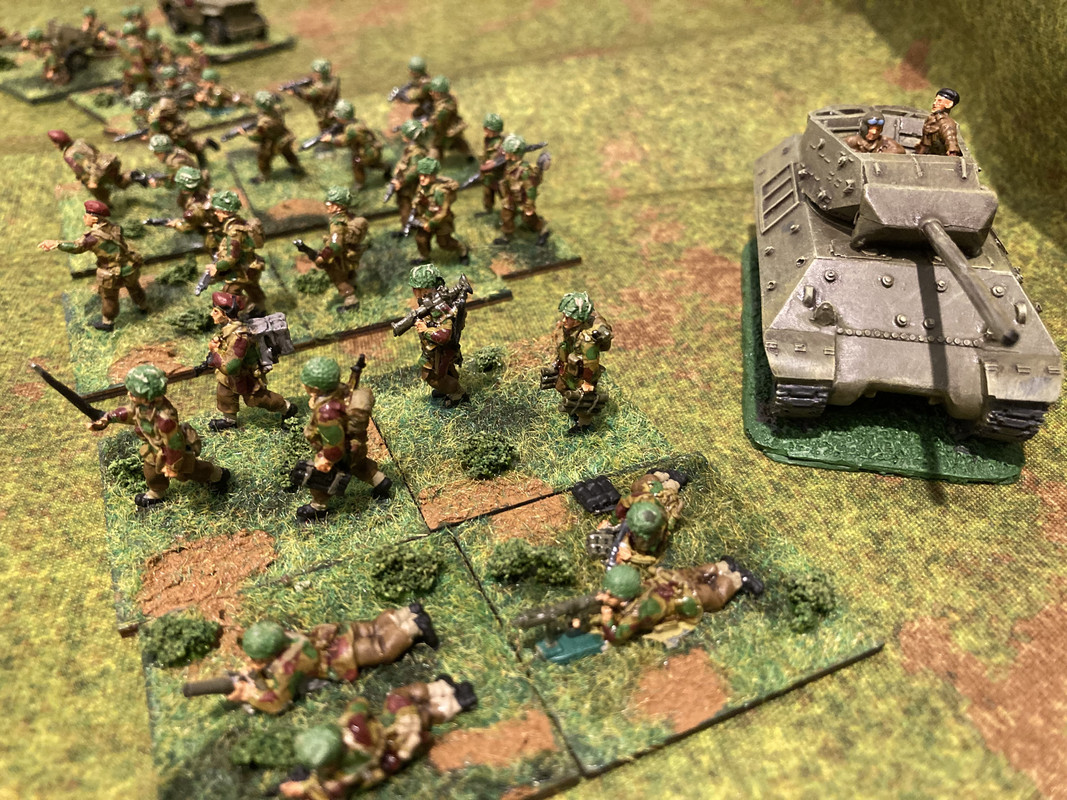
I have two easy solutions, and both can be used alone or combined. One is double flock, another is placing tufts of grass around the elevated base ( I use the latter almost always).
Anyway, I do not see so much problem leaving the as they are. Below you can see Hät Spanish infantry with one single flock and nothing else, and below that Dark Alliance Rangers with tufts around their plastic base:
-

blacksmith
- Posts: 430
- Member since:
01 Jul 2021, 10:02
It’s refreshing to see that I’m not the first person to face this challenge. I’m excited to try and tackle it in different ways. I can see how they would all be useful in different scenarios. All of your figures look amazing!
-
Dave2024
- Posts: 9
- Member since:
20 Jul 2024, 02:42
Dave2024 wrote:My wife is now regretting pushing me to find a new hobby.
Let her suffer
Alright, you've got plenty of useful replies. I can only say now welcome to the forum.
-
Santi Pérez likes this post. •
- Reply
-

Kekso
 Moderator
") Supporting Member (Bronze)
Supporting Member (Bronze) - Posts: 6880
- Member since:
19 Oct 2011, 18:32
15 posts
• Page 1 of 1